By Nicky Hedgecock.
As spring pushes into summer and the fine weather continues there is now an abundance of wild food and resources available to us. We are still not able to go back to work but I am enjoying greatly seeing the almost daily changes occurring in my local area. The garden is now producing its first crop of fruit and vegetables and I am loving being able to go and pick fresh for the dinner pot. I have also made Rhubarb and Ginger jam and enough Elderflower cordial to keep us going for a while. The Rhubarb crumble has now been replaced with fresh Strawberry tart.
My venture into infused oils has also been successful and I now have a supply of Calendula, Plantain, Comfrey, Rosemary and Yarrow oils. I will use these later in the year to make salves for various ailments like sore, chapped hands as the cold weather comes with winter.
On my walk this morning I noticed how quickly the blackberry brambles have come into flower and I am excited about being able to make some Bramble jelly later in the year when the fruits come but for now I am happy to take some of the long trailing brambles to make some pretty little baskets for storage of small items.
There is a step by step picture guide of the bramble basket making in our You Tube video: https://www.youtube.com/watch?v=QDIh4bGhSak
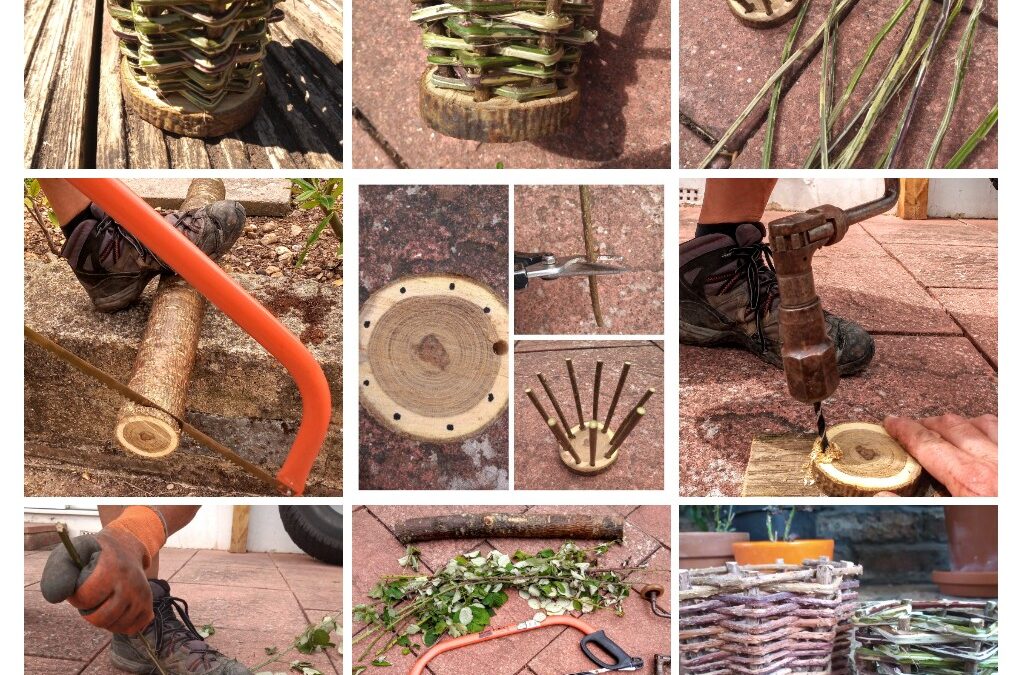
Picture 1 shows the equipment you will need for the project.
To start, you will need to cut a disc of wood from a longer branch. Use a bow saw or a folding pruning saw and remember to secure the piece of wood well enough to allow you to keep your hands on the saw only, see picture 2.
Once you have your disc of wood, mark it with a circle of 9 spots near the edge and drill each spot making a hole from one side of the disc to the other. You can use a bit and brace drill or an electric drill for this. The holes need to be at around 20 degrees to allow for the basket to be wider at the top than at the bottom, see pictures 3 and 4.
Using secateurs, cut 9 straight sticks of equal length and push them into the drill holes, see pictures 5 and 6.
Once you have your ‘frame’ ready you can strip the leaves and thorns off of the brambles by holding the bramble in a thick, bramble proof, gardening glove and pulling it through, under your boot.
Once you have stripped all of your brambles you are ready to start the weaving, see picture 7 and 8.
Make sure you use your thinner brambles at the bottom where the sticks are closer together as they have more flex than the thicker ones and always start with the brambles on the inside of one of the upright sticks so the ends are hidden on the finished basket. Simply weave the brambles inside one stick and outside the next and just keep going. As one bramble ends just add another, remembering to keep both ends on the inside, see pictures 9 and 10.
As you can see from pictures 11 and 12, they make very sturdy little baskets and the brambles will tone down as the dry out and age. You can make larger baskets by cutting a larger disc but you will need more holes drilled for extra supports and this always needs to be an odd number.
They also make a nice gift with a potted plant inside……enjoy.